Building a product doesn’t have to be expensive or time-consuming. Low-code platforms let you create MVPs (Minimum Viable Products) in weeks instead of months, saving up to 70% on costs. These platforms simplify development with drag-and-drop tools and pre-built components, while still allowing custom coding for flexibility.
Here’s why low-code is perfect for MVPs:
- Cost: Traditional MVPs cost $40,000–$80,000, but low-code reduces this to $20,000–$45,000.
- Speed: Build in 4–12 weeks instead of 4–9 months.
- Accessibility: Over 50% of low-code users are non-technical, enabling founders to test ideas directly.
- Scalability: Modern platforms support long-term growth and integrations.
To succeed, start by identifying a specific problem to solve and your target audience. Choose from top free and paid platforms like Bubble, FlutterFlow, or Retool that fits your project goals. Focus on core features, test with real users, and iterate based on feedback.
Low-code MVPs aren’t shortcuts - they’re tools to validate your ideas quickly and affordably.
Traditional vs Low-Code MVP Development: Cost, Time, and Success Metrics Comparison
This Startup Built Their MVP in Just 6 Weeks Using No-Code + AI
sbb-itb-33eb356
Defining Your MVP Goals and Target Audience
Before you pick proprietary low code platforms, you need to zero in on the problem you're solving and the people who need your solution. Here's a hard truth: over 60% of startups fail because they solve problems that don’t actually exist. Instead of chasing vague goals like "making things easier", focus on a specific, recurring pain point that real people deal with.
Identifying the Problem to Solve
Your MVP (Minimum Viable Product) should address one major issue that creates frustration, delays, or extra costs when left unresolved. Start by observing how people currently manage without a solution. Are they juggling spreadsheets, drowning in email threads, or constantly double-checking things manually? These "hacks" often expose the real problem.
Define your hypothesis clearly: "If we build X, users will do Y." For example, in early 2025, RentFund identified a common frustration among tenants and landlords - slow and overly complicated rent payment systems. Instead of building an all-in-one property management platform, founder Thomas Deneve honed in on simplifying payments. The result? Payment processing times were slashed by 50%, and within four weeks of launch, the company hit a $3 million valuation. This story proves that solving one problem exceptionally well can make a huge impact.
At this stage, list your assumptions about user behavior. How urgent is the problem? Will users change their habits or pay for a solution? Remember, these are just hypotheses until you test them. As Jesus Vargas, Founder of LowCode Agency, wisely said, "Metrics exist to reduce doubt, not boost confidence".
Once you've nailed down the problem, it's time to identify the people who feel its effects the most.
Understanding Your Target Audience
With the problem defined, shift your focus to the users who experience it most intensely. Create 2–3 user personas based on research, and start by targeting just one group. Dive into platforms like Reddit or Quora where your potential users hang out, and pay close attention to the language they use to describe their struggles. Their words should shape your app’s labels, user flows, and messaging.
When measuring success, prioritize activation over vanity metrics. Activation is when a user completes the main action your MVP promises - whether that’s booking an appointment, processing a payment, or generating a report. A handful of engaged, repeat users is far more valuable than thousands of one-time signups. The real goal? Prove that your solution delivers genuine value to the people who need it most.
Choosing the Right Low-Code Platform
Once you’ve identified your problem and target audience, the next step is picking the low-code platform that aligns best with your validation goals. As Jesus Vargas, Founder of LowCode Agency, explains:
"Low-code is a decision tool, not a permanent commitment."
Your focus should be on speed and learning, not locking yourself into a future-proof solution. This decision plays a key role in creating an efficient MVP and speeding up prototyping. Here’s what to keep in mind.
Key Factors to Consider
The first step is matching the platform to the type of product you’re building. For instance, if you’re developing a complex SaaS with advanced permissions and workflows, Bubble often stands out as a strong candidate. That said, your specific needs may point to other options.
Make sure the UI builder and workflow engine can handle your design and logic requirements without requiring too much custom coding. Also, assess whether the built-in database can handle the data volume you anticipate.
Integration capabilities are equally important. Look for platforms that offer native connectors or API support for essential tools like payment processors, CRMs, email automation, or webhooks.
Your team’s expertise should also guide your choice. Some platforms are user-friendly, with drag-and-drop interfaces designed for non-developers, while others may demand technical know-how for advanced features. Running a small pilot MVP can help determine if the platform feels intuitive for your team.
Scalability deserves attention, but don’t over-prioritize it during the MVP stage. At this point, your goal is quick validation, not a fully optimized long-term architecture. However, ensure the platform allows for exporting data or accessing underlying code to avoid vendor lock-in risks.
Lastly, don’t skip over security and compliance. Features like role-based access control, data encryption, and adherence to standards like GDPR or SOC 2 are essential if you’re dealing with sensitive information.
And, of course, always consider cost. Low-code MVPs are typically far cheaper than custom builds, but it’s still wise to choose a platform that fits your budget.
Using the Low Code Platforms Directory
Save time on research by leveraging the Low Code Platforms Directory. This resource organizes platforms by use case - such as AI, CRM, automation, e-commerce, internal tools, mobile apps, and web apps - allowing you to filter options based on your project.
The directory also provides traffic and popularity metrics for each platform. For example, WordPress sees 268.4 million monthly visitors, Salesforce attracts 86.3 million, and Airtable garners 19 million. These numbers can give you a sense of community support, which is helpful when you need tutorials, plugins, or troubleshooting help.
Beyond that, the directory includes technical stack filters to help you identify platforms compatible with your preferred tools, whether it’s Python, JavaScript, React, or PostgreSQL. Pricing information - like free tiers and subscription models - is also available, making it easier to find a platform within your budget. If your project has niche requirements, you can filter platforms by industry focus (like legal tech, finance, logistics, or HR). You can even review metadata such as company funding, employee size, and headquarters location to narrow your choices further.
Once you’ve shortlisted a few options, run a pilot to test them out. After selecting your platform, you’ll be ready to dive into building and designing your MVP.
Building and Designing Your MVP
Once you've chosen your platform, it's time to start building. The focus should be on creating a lean version of your product that delivers value from the start. As David Adkin, Co-founder of Adalo, explains:
"The overall idea of an MVP is that you should build the smallest amount of your product that people get value out of and then you add additional features to it."
This principle should steer every decision you make during the development process.
Prioritizing Features and Planning User Flows
Start by outlining assumptions about how users will interact with your product, their urgency, and their willingness to pay. These assumptions, especially the riskiest ones, should shape what you build first - not a long list of "nice-to-have" features. A strong MVP typically includes just 3–5 core features, focusing only on what’s necessary to solve the primary problem.
Concentrate on the "happy path", or the ideal sequence users follow to achieve their main goal. For example, in a food delivery app, the happy path might be: browsing restaurants, adding items to a cart, checking out, and tracking the delivery. More complex features, such as account recovery or rewards programs, can wait until the core functionality has been validated.
To stay organized, use the MoSCoW method to categorize features into four groups:
- Must-have: Critical for launch.
- Should-have: Important but not essential.
- Could-have: Nice additions, not priorities.
- Won’t-have: Features explicitly excluded from the current version.
This method helps you maintain focus and avoid overloading your MVP with unnecessary extras. Once your core features are clear, you can move on to building the product using low-code tools.
Using Low-Code Tools for Development
Low-code tools simplify the process of creating an MVP by allowing you to build interfaces with drag-and-drop editors, skipping most of the manual coding. These tools often come with pre-built components for essential functions like user authentication and payment processing through services like Stripe, which can be customized to suit your needs.
Some platforms even use AI to speed up development. For instance, Adalo’s "Magic Start" feature can generate database structures and user flows based on plain language descriptions, potentially cutting your development time by up to 90%. However, you’ll still need to tweak these outputs to ensure they align with your specific goals.
Visual logic editors make it easy to set up workflows and business rules without writing backend code. Integrating external data sources like Airtable, Google Sheets, or PostgreSQL is also straightforward, thanks to one-click integrations.
Another major benefit of low-code tools is that they allow for cross-platform deployment. You can build your app once and have it function seamlessly across web, iOS, and Android. Compared to traditional development, which can cost $50,000–$200,000 and take 3–6 months, low-code development costs significantly less - typically between $5,000 and $25,000 - and takes just 6–12 weeks.
To save time, start with templates instead of building from scratch. Pre-configured layouts and database structures can give you a head start, and you can adjust them to match your branding. Avoid adding complex customizations, heavy animations, or intricate branding early on, as these can create "design debt" and make it harder to iterate on or discard your MVP later.
Once your core functions are in place, shift your attention to ensuring your design is responsive and user-friendly across all devices.
Ensuring Mobile Responsiveness and Usability
When building an MVP, clarity should take precedence over visual polish. The design should make next steps obvious - if users hesitate or seem confused, it means the design isn’t effectively communicating its purpose. Keep the user journey focused on completing one primary task to ensure a straightforward experience.
For mobile-first products, choose platforms that support native app publishing rather than relying solely on web wrappers. Tools like FlutterFlow and Adalo allow you to create true native apps for iOS and Android, which perform better as your app scales. Following a major infrastructure update in late 2026, Adalo became 3–4 times faster and now supports over 1 million monthly active users.
Before launching, test your app’s interface across mobile, tablet, and desktop devices using staging previews. Consistency in buttons, forms, and layouts reduces cognitive load for users and makes it easier to refine your design. Break up crowded screens into smaller sections, simplify on-screen logic, and optimize images to ensure responsiveness.
Some platforms offer AI tools to help with performance. For example, Adalo’s X-Ray feature can detect potential slowdowns or logic errors before they impact users. Design with practical use in mind - account for interruptions, errors, and incomplete actions rather than only focusing on ideal scenarios. The goal is to guide users to the core value of your app in as few steps as possible.
Launching and Iterating Your MVP
Once your MVP is built and internally tested, it’s time to bring in real users to refine your product. This phase is all about gathering actionable insights from early adopters to improve your core solution. Start with a soft launch - introducing your MVP to a small, carefully selected group of target users instead of a broad public release. This approach keeps feedback focused and avoids distractions from surface-level metrics like page views or sign-ups. By closely monitoring user interactions, you can identify where users hesitate, repeat actions, or drop off, laying the foundation for meaningful improvements.
Soft Launch and Beta Testing
Before releasing your MVP to external users, conduct internal simulations to catch bugs and usability issues. Once internal testing is complete, move to beta testing with a small group of 10 to 50 users who closely match your target audience. This phase typically lasts 1 to 2 weeks and focuses on observing real user behavior instead of collecting subjective opinions.
One key area to watch is the onboarding experience. If users struggle during onboarding, it could signal a gap in how your product communicates its value. Design the onboarding flow to guide users toward the "Aha!" moment - when they experience the primary value of your product. For instance, in a task management app, this might be the moment a user creates and completes their first task. Track how many users reach this milestone within the first 24 hours, as the activation rate is a strong indicator of whether your MVP delivers immediate value.
Gathering and Analyzing User Feedback
Once your MVP is live, focus on collecting both behavioral data and direct user feedback. Tools like Mixpanel or Amplitude can help you track user actions, while in-app surveys or interviews can provide insights into their motivations. Keep surveys concise - 5 to 10 questions - and time them strategically, such as right after a user completes a core task.
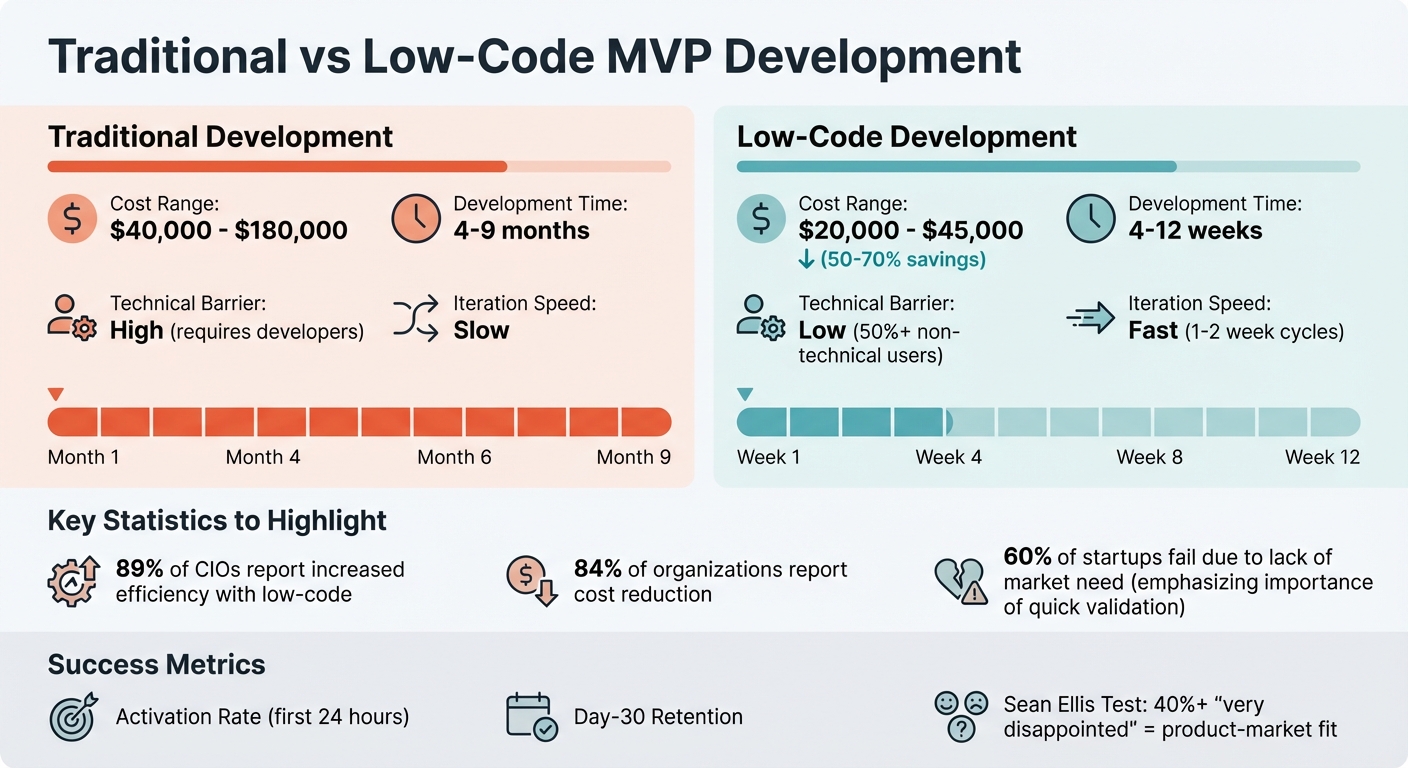
Organize the feedback you gather into three categories: Bugs (technical issues), Missing Features (gaps in functionality), and Usability Problems (areas where users encounter friction). This system helps you prioritize fixes effectively. Avoid getting sidetracked by vanity metrics like page views or sign-up counts. Instead, focus on metrics that matter, like retention and repeat usage patterns. A helpful benchmark is the Sean Ellis Test: if more than 40% of users say they’d be "very disappointed" if they could no longer use your product, you’re on the right path toward product-market fit.
Making Data-Driven Iterations
With feedback in hand, use it to guide quick, data-driven updates. The Build-Measure-Learn loop is a great framework for refining your MVP in short cycles, typically 1 to 2 weeks per iteration. Prioritize updates using methods like MoSCoW or RICE, focusing on the 20% of features that deliver 80% of the value.
Track key performance indicators (KPIs) to measure progress: Activation Rate (how many users complete a core action in the first 24 hours), Day-30 Retention (the percentage of users who return after a month), and Churn Rate (the rate at which users stop using your product). These metrics help you assess whether your iterations are improving the user experience. Set up a workflow to deploy updates quickly - minor fixes and improvements should roll out within days, while more complex changes might take 4–6 weeks. Responding swiftly to feedback ensures you’re addressing issues while they’re still fresh.
Conclusion
Low-code MVPs are a cost-effective and time-saving alternative to low-code vs traditional coding. While traditional MVPs can range from $40,000 to $180,000 and take 4–9 months to launch, low-code solutions typically cost $20,000–$45,000 and can be ready in just 4–12 weeks. This approach not only speeds up development but also boosts efficiency - 89% of CIOs agree - and helps cut unnecessary expenses, as confirmed by 84% of organizations.
The real strength of low-code MVPs lies in their ability to validate ideas quickly and affordably. Considering that over 60% of startups fail due to a lack of market need, early validation is crucial. Low-code MVPs are designed to address this challenge by enabling rapid learning and testing. As Jesus Vargas, Founder of LowCode Agency, explains:
"Low-code MVPs are not shortcuts to success. They are tools for learning".
Once you’ve validated your assumptions, the next step is to focus on a single core feature that addresses a real problem. Let user feedback guide your iterations. Whether you’re building a SaaS product with Bubble, a mobile app with FlutterFlow, or an internal tool with Retool, the platform you choose should align with your validation goals - not just your long-term technical plans. This approach ensures you’re solving real problems while using the right tools to test your ideas.
To simplify the selection process, check out resources like the Low Code Platforms Directory. It allows you to filter platforms by functionality - AI, automation, CRM, web development, and more - so you can quickly identify the tool that best fits your needs. This way, you can start building on a platform that supports your core objectives right from the beginning.
FAQs
When should I avoid low-code for my MVP?
Low-code platforms might not be the best choice for your MVP if they hinder performance or scalability. For example, working with large datasets exceeding 30,000 records or extensive lists with over 10,000 items can lead to noticeable slowdowns, which can hurt the user experience. These platforms often struggle with projects that demand high performance, extensive customization, or efficient management of large amounts of data. While they’re excellent for quickly building prototypes, you might find yourself needing to shift to custom development as your application expands.
How do I pick the 3–5 features my MVP must include?
When deciding on the 3–5 features for your MVP, focus on the essentials - those core functionalities that directly address your main value proposition and meet the needs of early users. Start by brainstorming a list of all possible features, then narrow it down by prioritizing the ones that are absolutely critical to solving the primary problem your product aims to address.
The goal is to include only the features necessary to validate your concept, showcase value to users, and collect meaningful feedback. Avoid adding extras that could complicate development. Keeping things simple allows for faster progress and smarter use of resources.
What metrics should I track to know my MVP is working?
To determine if your MVP is hitting the mark, keep a close eye on key metrics that reveal how users interact with it. Metrics like user engagement, retention rates, and customer feedback can help you validate your assumptions and gauge product-market fit.
Pay attention to indicators such as:
- Active users: Are people consistently using your product?
- Retention rates: Are users coming back after their first interaction?
- Feature usage: Which features are being used the most, and are they solving the problems they’re designed for?
- Customer feedback: What are users saying about their experience? Are there recurring suggestions or complaints?
These insights will help you understand whether your MVP aligns with user needs and delivers real value.