Managing leads manually is a time sink, prone to errors and inefficiencies. Automating this process with low-code platforms can save you hours each week while improving lead quality and conversion rates.
Here’s the gist:
- Low-code tools allow non-technical teams to create workflows that handle lead intake, validation, enrichment, scoring, and routing.
- Automation reduces manual tasks, minimizes errors, and ensures faster response times - key to qualifying leads effectively.
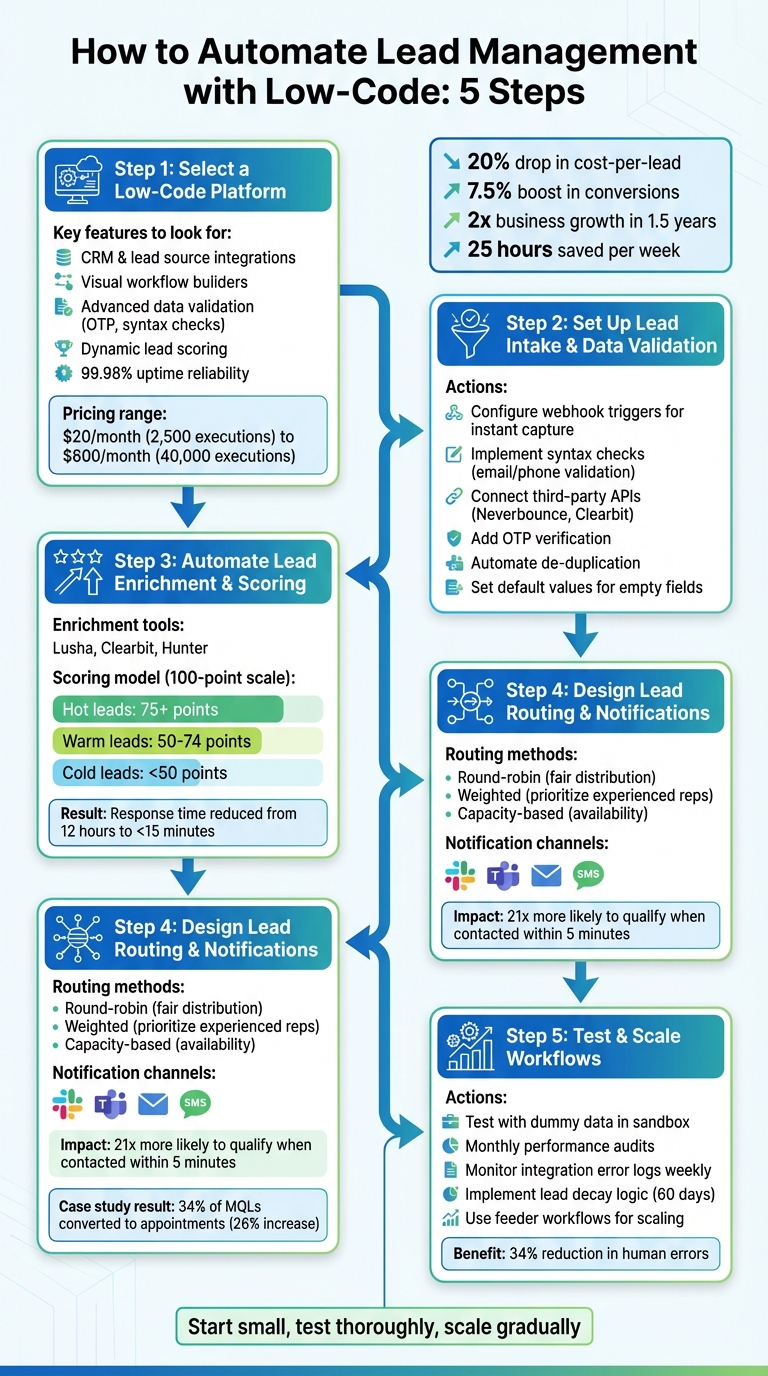
- Companies like Veo have achieved measurable gains: a 20% drop in cost-per-lead, a 7.5% boost in conversions, and doubled business growth in just 1.5 years.
By integrating apps, validating data, and prioritizing high-potential leads, low-code platforms streamline the entire process. This ensures every lead is tracked, scored, and routed to the right sales rep - fast.
Key Steps:
- Choose from various free low-code platforms that integrates with your tools and supports visual workflow building.
- Set up workflows for lead intake and data validation to eliminate duplicates and errors.
- Enrich and score leads to focus on high-priority prospects.
- Automate lead routing and notifications for faster follow-ups.
- Test, monitor, and scale workflows to handle growing lead volumes.
Automation doesn’t just save time - it ensures consistency and accuracy, helping your team focus on closing deals instead of managing data.
5-Step Lead Automation Workflow with Low-Code Platforms
How to Build An Automated Lead Management System In Make.com (Pipedrive)

Step 1: Select a Low Code Platform
Choosing the right platform is essential for effective lead automation. It needs to integrate smoothly with your existing tools and be user-friendly enough for non-technical teams to handle. Picking the wrong platform could lead to fragmented data, extra manual work, and wasted resources.
Review Platform Features
Start by assessing how well the platform integrates with your current tools. It should connect effortlessly with your CRM, lead sources like Facebook Lead Ads, TikTok, or Typeform, and communication tools such as Slack or Microsoft Teams. Platforms with a wide range of pre-built connectors can save you from the hassle of custom development.
Look for platforms offering visual workflow builders. These let you create multi-step automations with triggers, conditional paths, and reusable workflows. To maintain clean data, prioritize features like advanced validation - think One-Time Password (OTP) verification for emails and phone numbers or syntax checks that block invalid entries before they hit your CRM.
Dynamic lead scoring is another must-have. This feature assigns real-time scores based on factors like job title, budget, or company size. Combine this with automated routing rules to ensure leads are distributed to the right sales reps, whether by geography or priority. For larger organizations, features like role-based access control (RBAC), encryption, and audit logs are essential for security and compliance.
When it comes to pricing, compare plans based on workflow execution limits. For instance, a starter plan might offer 2,500 executions for $20/month, while enterprise options could scale up to 40,000 executions for about $800/month. Also, prioritize platforms with high reliability - those boasting 99.98% site uptime and 99.94% execution rates ensure your leads move through the system without delays.
To simplify your decision-making process, use tools like the Low Code Platforms Directory to compare features and pricing easily.
Use the Low Code Platforms Directory
Once you’ve identified the features you need, the Low Code Platforms Directory can help you narrow down your options. This resource allows you to filter platforms based on your specific requirements, such as automation capabilities, pricing tiers, and supported tools. Instead of testing dozens of platforms manually, use the directory’s filtering system to quickly find solutions that match your lead sources and CRM.
The directory also provides side-by-side comparisons of key metrics like execution limits, workflow capacities, and security features. Plus, it highlights newer platforms entering the market, giving you access to tools with cutting-edge features tailored for lead management workflows. This centralized approach saves time and ensures you make an informed decision.
Step 2: Set Up Lead Intake and Data Validation
Now it’s time to create workflows that not only capture leads but also verify their accuracy before they enter your CRM. This ensures that only useful, actionable prospects make it through.
Configure Lead Intake Workflows
Using webhook triggers, proprietary low-code platforms can instantly collect lead data from sources like website forms, Facebook Lead Ads, TikTok, or email marketing tools. Think of these workflows as a central hub - they "catch" incoming data, standardize it into a consistent format, and send it to your CRM without requiring any manual effort.
Separating your lead capture process from marketing automation is a smart move. This allows for server-side rendering, which leads to faster load speeds and better reliability.
Modern tools, like AI assistants (e.g., Zapier Copilot), make setting up forms and workflows even easier. For instance, you can describe the type of data you need, and the AI will suggest field structures and automation rules. Once the data is captured, it’s automatically mapped to the correct fields in your CRM - for example, linking "Selected Service" to "Interest Category." This ensures every lead enters your system as a well-organized, actionable profile.
Once your lead capture process is running smoothly, the next step is to validate the data to ensure it’s accurate and reliable.
Automate Data Validation
After capturing leads, validating the data immediately ensures that only high-quality information feeds into your CRM.
Validation happens right after the data is captured - before it reaches your CRM. Start with syntax checks using tools like text helpers or regex patterns to confirm that email addresses and phone numbers are properly formatted. This step catches simple errors like typos or incomplete entries.
For more advanced verification, connect with third-party APIs like Neverbounce or Clearbit Risk. These tools can flag disposable email addresses, free providers like Gmail or Yahoo, and even fraudulent entries, helping you weed out unreliable leads. Adding OTP (One-Time Password) verification for email or phone numbers is another way to confirm the lead is genuine and has an active contact method.
To prevent duplicate data, use automated de-duplication. Set up your workflow to check for existing records in your CRM by using unique identifiers like email addresses. This ensures you don’t create duplicate entries and keeps your customer database clean. You can also use "formatter" steps to standardize incoming data - for example, capitalizing names, converting date formats, or cleaning up property values to match your CRM’s structure.
Lastly, set default values for any empty fields. For example, replace missing data with "Unknown" to maintain consistency across your database. This way, your reports and analytics remain complete, even if some leads skip optional fields.
Step 3: Automate Lead Enrichment and Scoring
Once you've validated your data, the next move is to enrich leads with missing details and identify high-potential prospects. This step fine-tunes your process by focusing on leads most likely to convert.
Integrate Lead Enrichment Tools
Using low-code development platforms like Zapier or n8n, you can connect your CRM to enrichment APIs such as Lusha, Clearbit, or Hunter. These tools allow you to automate the process: when a new lead enters your system, their email or company domain is sent to the enrichment service, which fills in any missing data.
To save API credits and avoid wasting time, add a filter to block low-quality email domains (e.g., @gmail.com, @yahoo.com). Leads with personal email addresses or incomplete information can be flagged for manual review. For instance, in November 2025, Tray.ai developed a workflow combining Marketo webhooks with Clearbit and Datafox. This setup enriched inbound leads, updated Salesforce records, and marked incomplete entries as "Bad Data", ensuring unqualified leads didn’t reach the sales team. High-quality leads were flagged, and sales reps received notifications through Slack or Teams.
"Speed is everything in revenue operations. When a new lead arrives, every extra step, manual research, missing data, or incorrect routing - creates delay. Those delays cost you deals." - Nirit Braun, Senior Content Strategist, Lusha
Once your data is enriched, the next step is scoring leads to prioritize them for immediate follow-up.
Build Lead Scoring Models
A solid lead scoring model uses a 100-point scale, breaking it down into categories like Company Fit (industry, size), Role Fit (job title, seniority), Intent Signals (website activity, content engagement), Tech Fit (compatibility with your stack), and Data Quality. Leads are then grouped into tiers: Hot (75+ points), Warm (50–74 points), and Cold (below 50 points).
To ensure accuracy, use binary ("IF") and multi-value ("Switch") logic to evaluate both behavioral and demographic data. For example, standardize job titles with AI tools before scoring - "Head of RevOps" might be mapped to "Director" for consistency.
In November 2025, a SaaS startup implemented an automated lead scoring system with Formaloo, cutting their lead response time from 12 hours to under 15 minutes. They scored leads based on criteria like budget, timeline, and company size. Negative signals, such as unsubscribing from emails or visiting "Careers" pages, were penalized to reflect lower purchase intent.
| Scoring Criterion | Type | Example Rule | Points |
|---|---|---|---|
| Downloaded Pricing Guide | Behavioral | pricing_guide_downloaded = true |
+30 |
| Job Title contains "Head" | Demographic | job_title CONTAINS "Head" |
+20 |
| Visited 5+ Pages | Behavioral | page_views >= 5 |
+10 |
| Industry is "Technology" | Firmographic | industry = "Technology" |
+15 |
| Unsubscribed from Emails | Behavioral | email_status = "unsubscribed" |
-50 |
Review your scoring model every quarter to ensure it aligns with actual conversion trends. For example, if "Warm" leads are converting as effectively as "Hot" leads, adjust your thresholds accordingly. Use scoring thresholds to trigger immediate actions - like adding high-scoring leads to personalized email campaigns through tools like Lemlist or Mailforge.
sbb-itb-33eb356
Step 4: Design Lead Routing and Notifications
Once leads are scored and prioritized, the next step is ensuring they land with the right sales rep - fast. Delays in lead routing can give competitors a head start, and research shows that contacting leads within five minutes makes them 21 times more likely to qualify compared to waiting 30 minutes.
Create Routing Rules
Start by defining clear routing criteria, such as territory, company size, industry, lead score, or source. Use rule-based logic to match leads accurately. For instance, you might route leads based on both geography and industry specialization to ensure the best fit.
Choose a distribution method that aligns with your team's structure and volume:
- Round-robin: Ensures fairness by rotating leads evenly among reps.
- Weighted distribution: Prioritizes experienced teams for high-value leads.
- Capacity-based routing: Assigns leads based on availability during peak times.
Don’t forget to set fallback rules for unmatched leads, using tools like HR or calendar data. For account-based strategies, ensure existing customers are routed to their current account owner to maintain continuity.
A great example of automation at work: In 2023, RCReports integrated Calendly Routing with Salesforce to eliminate manual lead reassignment. Before this, account executives were spending at least five hours each month reassigning leads booked on the wrong calendars. Now, with real-time Salesforce lookup, leads are matched directly to the correct account executive based on ownership data.
Once the routing is in place, the next step is to make sure reps are notified quickly for immediate follow-up.
Set Up Notifications
Timely notifications are key to maintaining momentum. Configure multi-channel alerts - like Slack or Teams - with email as a backup to ensure reps act within five minutes. These alerts should include critical lead details such as company name, industry, source, and pain points, so reps can prioritize without toggling between tools.
For accountability, create corresponding CRM tasks (e.g., "Contact within 5 minutes"). If no action is taken within 24 hours, set up automatic escalation to a manager. To avoid overwhelming your team with unnecessary alerts, use filters to ensure only high-priority or sales-qualified leads trigger immediate notifications.
Automated notifications close the loop, making sure every lead - validated, enriched, and scored - receives prompt attention.
In October 2023, Smith.ai implemented Calendly’s automated routing with Salesforce integration to streamline lead distribution. Led by Sales Enablement Manager Bryce Kropf, this shift eliminated manual hand-offs and resulted in 34% of marketing qualified leads converting into appointments directly from the website. This was a 26% increase in demos booked through web forms.
"Our team is not left having to deal with unnecessary lead-flow logistics. More productivity at scale means more revenue secured, so we consider this a major win." - Bryce Kropf, Sales Enablement Manager, Smith.ai
Notification Types and Their Benefits
| Notification Type | Best Use Case | Key Benefit |
|---|---|---|
| Slack/Teams | High-intent demo requests | Immediate visibility in the rep's primary workspace |
| CRM Task | Standard follow-ups | Creates a permanent record and accountability trail |
| Email Alert | Backup/Off-hours | Ensures a record exists even if chat apps are muted |
| SMS/Text | Urgent/VIP leads | Highest visibility for time-sensitive enterprise opportunities |
Step 5: Test and Scale Your Lead Automation Workflows
Creating automation workflows is just the beginning - testing and scaling them ensures they work effectively in practical scenarios. Companies using automated workflows save, on average, 25 hours per week when these systems are reliable and efficient. Let’s dive into how you can test functionality, monitor performance, and scale workflows to handle growth without disruptions.
Test Workflow Functionality
Before going live, thoroughly test workflows with internal contacts or dummy email addresses to ensure triggers, delays, and conditions work as expected. Check that data transfers correctly between integrated apps and confirm that tokens like {{contact.firstname}} populate accurately. For tools like Salesforce, use a sandbox environment to test record creation and field syncing before launching workflows.
To avoid accidental emails being sent to prospects during testing, add a temporary safety condition like "Exit if email contains @yourcompany.com". Break down large workflows into smaller, focused modules - for example, separate flows for lead scoring, nurturing, and notifications. This modular approach makes troubleshooting much easier. As Manmeet Singh, Founder of Code and Peddle, wisely says:
"Testing isn't optional; it's the difference between an automation that runs and one that performs".
Monitor and Optimize Performance
Once your workflows are live, conduct monthly audits to spot bottlenecks or areas where leads tend to stall. Check integration error logs weekly, especially for CRM syncs, to catch issues like field mismatches or API errors early on. Analyze converted leads against your MQL (Marketing Qualified Lead) scoring models and adjust triggers to improve accuracy.
To maintain a healthy pipeline, implement lead decay logic that automatically lowers a lead’s score after 60 days of inactivity. Set up performance alerts to flag unusual activity, such as sudden spikes or drops in workflow executions, which could indicate a malfunction. Automating data entry tasks can also reduce human errors by as much as 34% when paired with consistent monitoring.
These performance insights will guide you as you scale your workflows to support growing demands.
Scale for Growth
Scaling becomes much more manageable when you’ve built a solid foundation through testing and regular audits. To handle higher volumes without sacrificing accuracy, consider using feeder workflows that channel data into a central catchall workflow via webhooks. This approach simplifies updates, allowing you to make global changes in minutes rather than hours. For added security, log raw form submissions to a backup source like Google Sheets.
Case studies highlight how systematic scaling can cut costs and boost conversion rates. Businesses that centralize lead management automation often see significant drops in cost-per-lead and measurable improvements in conversion metrics.
Take advantage of platform-specific tools like execution credits in Make or shared workspaces in Zapier Enterprise to handle larger volumes and enable team collaboration. Review your lead scoring and routing rules quarterly, comparing automated scores with actual conversion data to ensure thresholds remain effective. With robust testing and monitoring in place, your workflows can scale seamlessly as your business grows.
Conclusion
The five steps outlined earlier come together to create a powerful and scalable lead management system. Using low-code platforms to automate this process can completely change how businesses manage their leads - from the initial capture to the moment they're ready for the sales team. By centralizing data from different sources, validating and enriching it automatically, routing leads intelligently, and scaling workflows as your business grows, you set up a system built for long-term success.
The results speak for themselves. Automated lead management improves efficiency and boosts conversion rates, as shown by real-world examples from various industries. These case studies highlight how low-code solutions can reshape the way modern businesses approach lead management.
Begin with small steps, test your processes thoroughly, and expand gradually. The workflows you establish now will position you to handle a growing number of leads in the future - without overwhelming your team. With low-code platforms, your team can shift focus from repetitive tasks to driving growth and building effective strategies.
FAQs
What should I automate first in lead management?
Automating lead qualification is a smart move to kickstart your lead management process. It helps identify and prioritize the most promising leads, making your sales process smoother and more efficient. By zeroing in on high-potential prospects from the start, your team can focus their efforts on meaningful follow-ups and nurturing, ultimately saving valuable time and resources.
How do I keep bad or duplicate leads out of my CRM?
To keep bad or duplicate leads out of your CRM, set up automation workflows to handle verification and qualification before leads are added. These workflows can do the heavy lifting by confirming the legitimacy of leads, spotting duplicates, and ensuring consent is valid. On top of that, automatic lead qualification can score and enrich leads, helping you focus on the most promising prospects. This approach not only saves time but also keeps your database clean and accurate - no manual work required.
How can I route leads fast without spamming my sales team?
Automated lead routing systems help streamline the process of assigning leads to your sales team, ensuring no one gets overwhelmed. These tools work by instantly distributing leads to the right sales reps based on specific criteria like territory, expertise, or lead score. With low-code platforms, you can easily set up and tweak routing rules to fit your unique needs. This ensures leads are handled quickly and accurately, reducing delays, improving conversion rates, and allowing your sales team to focus on the most promising opportunities.